
Incorporating mixed media and armature into a sculpture
- Armature: a strengthening structure which is left in an object after curing.
- Sculpture: an artistic form in which hard or plastic materials are worked into three-dimensional art objects.
- Mixed media: artwork in which more than one medium or material has been employed.
Polymer clay is one of the most versatile artistic materials available and can be used for sculpting anything – with support. Without support, large hollow polymer clay sculptures tend to collapse. Armatures to support sculptures can be designed for removal after baking or can be incorporated into the sculpture itself to prevent the risk of collapse. When conditioned and baked correctly, polymer has a great deal of strength and some elasticity, but it is still vulnerable. Several materials can be used for permanent armatures depending on the finished sculpture. Choosing the correct armature material is important to avoid incompatible components.
One of the first things to consider in choosing the appropriate armature is whether the substance is porous or non-porous. Substances such as wood are very porous and will shrink underneath the clay sculpture. This shrinkage can cause the clay to crack. Porous surfaces can be prepared to help alleviate the chance of cracking by baking prior to adding the clay veneer. Eggs can also be used under clay, but should have a thin layer of glue dried on the surface to make the clay adhere and help prevent any cracking from baking. Glass, metal, wire, and aluminum foil all work well with clay as they are non-porous and won’t shrink.
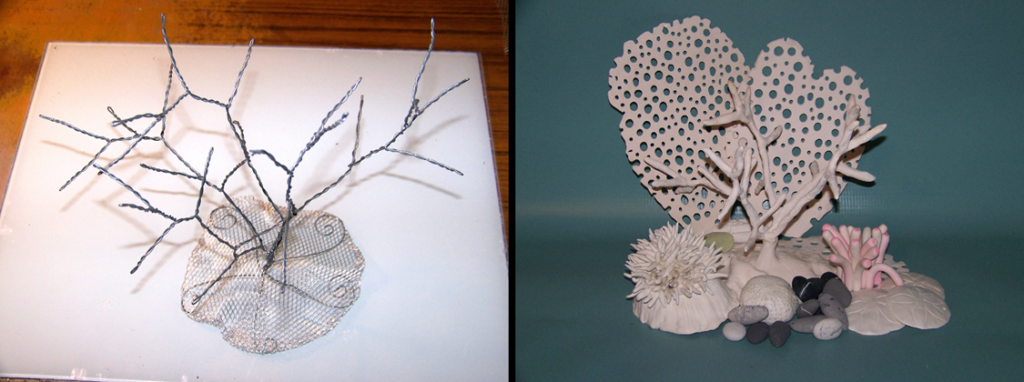
The most common forms of armature used with polymer clay are wire and aluminum foil. The type of wire chosen for the project will depend on how much flexibility it needs. For strength and stiffness steel wire is usually best, but for versatility copper wire should be used. Clay can be applied directly on the wire and the piece can carefully be adjusted after baking depending on the thickness of the clay veneer. To build up a bit of bulk, adding aluminum foil around the wire works miracles. You may need to cover the wire and foil with a layer of paper tape to smooth out any rough edges. In the example below, the wires at the base of the sculpture are covered in wire mesh and then clay to support the finished piece.
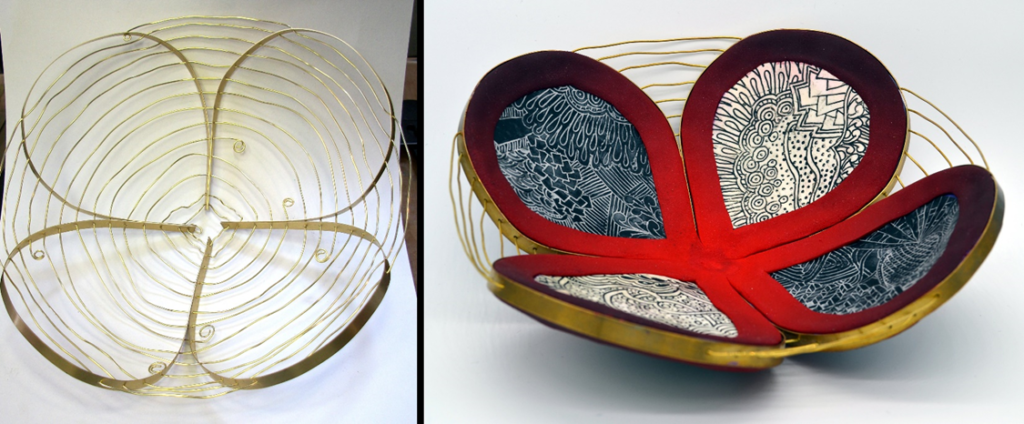
Expanding on the use of wire and clay, you will see below a frame made from strips of metal and wire woven together to form the base of a sculptural basket. The edges of the metal strips have been hammered so they curve up into the shape of a bowl. Holes were punched into the strips so the wire could be woven through for the structure of the basket. A layer of scrap clay is then baked inside the metal strip frame to cover the woven wire. Alternative base material could be ultra lite clay or apoxie sculpt depending on what the final weight of the sculpture needs to be. The final clay veneer is then applied and a bottom ring added for stability. The finished sculpture celebrates the combination of wire, metal, and polymer clay and is structurally sound.
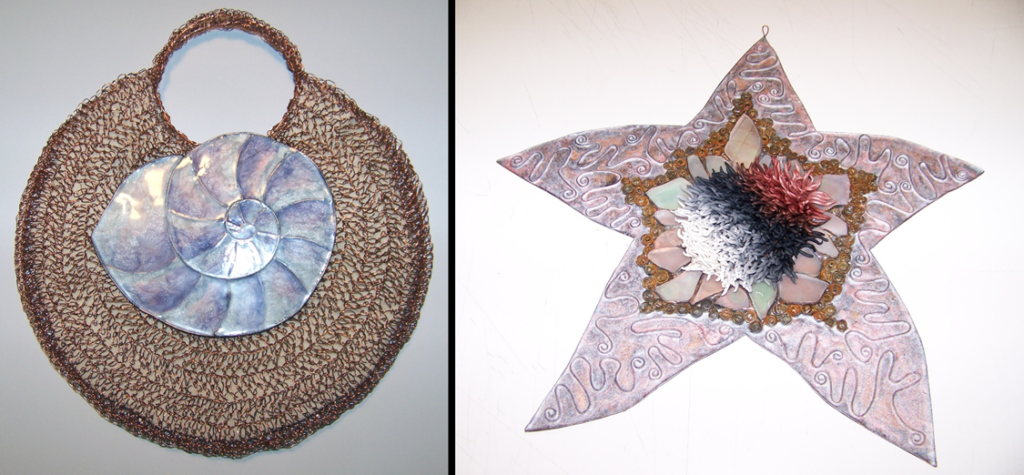
Sheet metal works beautifully as a background for liquid clay. Sheets of copper can have wire and other found objects soldered to them or baked into the liquid clay to create wonderful mixed media sculptures. Materials such as wire, sea glass, coils of metal strips, stone cabochons, and polymer clay are other items that can be used on the sheet of copper. The liquid clay – with or without colorants – applies easily to the metal and remains attached to the background with baking. The finished piece can resemble enamel depending on the colorants added to the liquid clay.
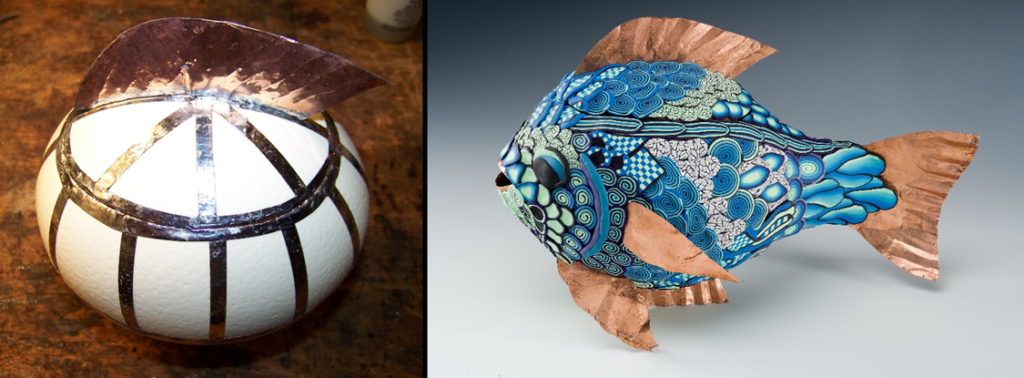
Believe it or not, ostrich eggs (hollowed and sterilized) make great armatures for clay sculptures. They do take a bit of preparation to hold the clay without cracking. The egg can be cut apart using a rotary blade on a Dremel tool. A mask is necessary for this as it creates a lot of dust and the carving can cause a burning smell. This fish sculpture was created years before knowing about apoxie sculpt, so the copper fins were soldered to the shell with materials normally used for stained glass art. Once the shell is properly prepared it can safely be baked covered with polymer clay. The egg can be used entirely or it can be cut up into pieces as the base of smaller sculptures.
Shells are a wonderful surface to build sculptures on, but are very porous. A very thin layer of apoxie sculpt dried on the outside surface of the shell will create a fabulous platform to build the sculpture while helping to prevent cracking.
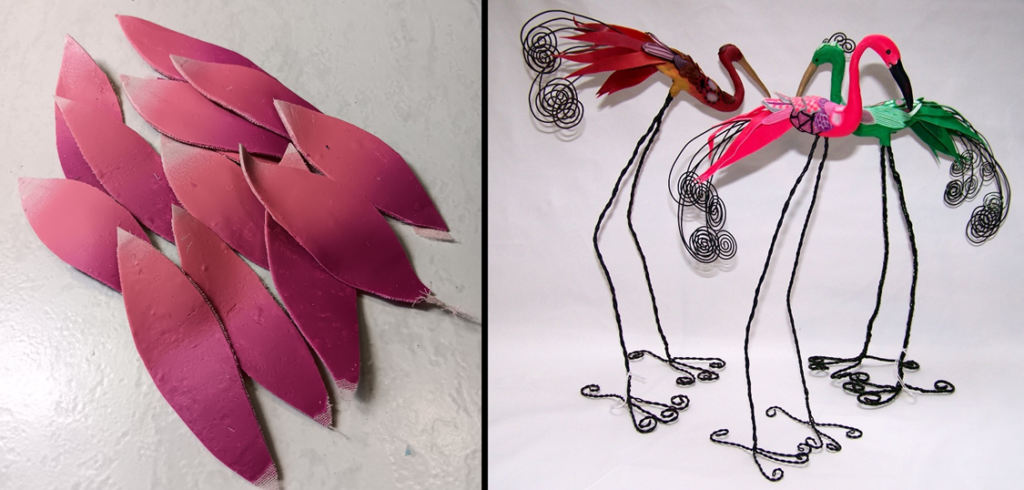
So far, we have covered armatures that help make a sculpture strong and stiff, but sometimes it is necessary for the polymer clay to be very flexible as well as strong. Loosely woven fabric such as gauze can be used as a lining for polymer clay veneers. Layering the clay on each side of the material and running it through the pasta machine will create a strong flexible sheet once it is baked. Using gauze instead of wire mesh allows the sheet to be cut to shape without pieces of wire showing along the edge. The tail feathers on these birds were cut from sheets of clay and gauze to give them strength as they are not supported by any structure.
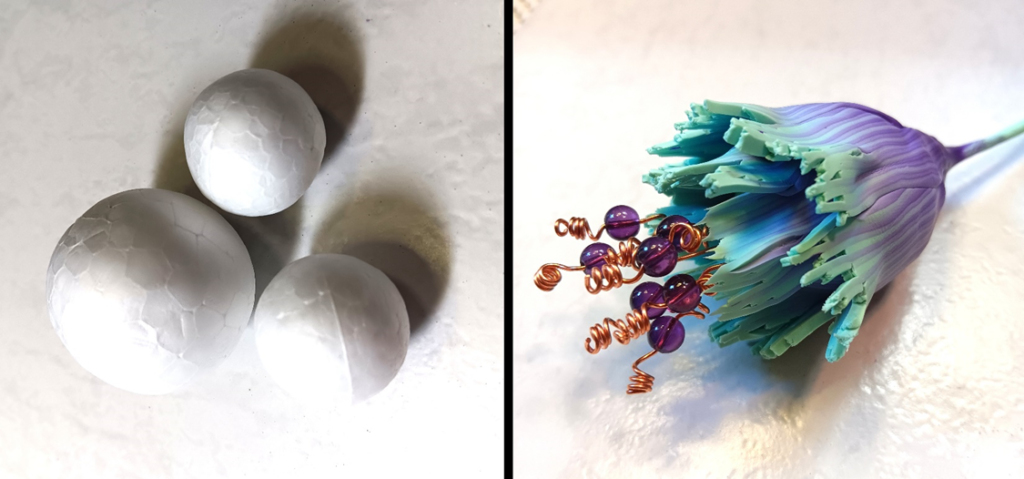
Another fiber armature that can be used with polymer clay are spun cotton balls such as Spunnys. Do not mistakenly use Styrofoam balls as they shrink upon baking and will destroy your sculpture. The Spunnys come in a variety of shapes and sizes and the clay adheres nicely to the cotton. Leaving a slightly larger hole and wetting the piece once baked you can also remove the cotton ball by pulling the fibers through the hole. The cotton is light enough in weight that it isn’t necessary to remove it unless desired
Any number of items can be used for armatures, but if there is any question, put the item in the oven by itself first and make sure it can handle the heat. Some plastics will melt while others can make effective armatures. Glass is great with clay, but needs to be put in a cold oven, heated up and then allowed to cool down in the oven so the glass doesn’t crack. Experimentation is also needed for any mixed media items that are to be added to the sculpture. Now it’s time to let the imagination go wild and have some fun discovering what various armatures can do for your sculptures.
Author: Linda Leach
Editor: Sandy Clement
Photo credits: Linda Leach & Sandy Clement
